
Organizing a THM Binder
- Carrie Causey
- Apr 11, 2022
- 10 min read


I used to be a homeschool mom. I was one of the type that LOVED the beginning of the school year! All the new binders, supplies and books - everything was so much fun to open and organize! I made my own spreadsheet planner for each kid (I only have 2) and for myself, printed it all out, and made everything beautiful. I LOVE making things organized and beautiful. If you smile when you see it, you're more likely to continue to use it.
My kids are in a fantastic Classical Christian School now, and thriving beyond my wildest dreams! See, I also struggled to teach all the subjects, to keep up with everyone's work, to grade things (ever), and I didn't know how to lean on each kid in just the right way to make them want to excel. Lots of homeschool moms are great at those things as well... just not me.
Now I have a little more brain space to focus on the health and healing of my body, but the beautifully-organized part of my brain has started to itch for something to crunch on.
I finally purchased the THM Membership and lo-and-behold, THERE is something to organize! If you haven't tried it yet, I encourage you to do so! I wrote a quick blurb on Facebook telling everyone why I thought it was worth it, and it went something like this:
$70/year = $6/month = 1 big drink from Starbucks = 1/2 meal at Chick-Fil-A = 1/3 of an Audible Membership. You're worth much more than that. And you probably buy some of those weekly and never bat an eye.
The 10% discount means that you might pay it off in 5-6 orders.
The 10% discount might mean that you switch to buying MORE from the THM store, which not only supports our favorite girls, but also means you get far higher quality products.
You get all the new recipes - like almost 2,000 recipes that aren't in the books.
Yeah, that's my blurb on the Membership site... I'll leave-off saying more.
When I had poked around for long enough (Mama Fox has a fantastic series of mini videos on how to navigate the site and make use of all the features - join her free group on Facebook to find those!) I found the printable binder kit - be still my heart! I had spent hours designing homeschool binders and this was right up my alley! I quickly dug through all my old stuff (cause it's still hanging around, taking up space in my bookshelves - those might be useful someday!) and assembled the binder with their materials. Then a took a step back and realized that THEIR method was great and all, but I already had a system in my brain that I'd used for years that I loved. That was MORE organized. That was easier to navigate. That made more sense to ME. That wasn't all that different, just tweaked - like each of our journeys. There's nothing wrong with their binder layout, I just wanted to tweak it for my brain! Plus, then I got to buy a new package of my favorite binder dividers, cause I didn't have quite enough. (new supplies addiction, remember?) I had always videoed a tour of my binders for other homeschool mamas who struggled with organization themselves, and I got great feedback! When you're not personally blessed in an area, you go find someone who does the thing you wish you could do, then just copy them! That's what YouTube and bloggers are for!
That was along intro... sorry Mamas! Now we'll get into the binder tutorial, which DOESN'T require a membership! If you have it, totally go print their kit because their covers are cute! But you can still make a great binder to organize all your printed recipes and journey pages, even without the cute pages. I have tons of recipes from THM bloggers, and I have to keep them somewhere! If you have zillions of them floating around, or stuffed between the pages of your cookbook (like I do!) or in a horizontal file-of-doom on your desk, then come along with me and make your THM life easier!
NOTE TO THM NEWBIES:
Remember how this is basically my hobby? Yeah, it makes me happy. If you are still brand new on your journey, you are probably in one of these places:
WOW! There's so much stuff to know and do and organize, this is exactly what I need to really get going and commit! (having a new pretty binder will make you want to open and use the resources inside!)
WOW! There's so much stuff to know and do and organize, this is SO overwhelming and if I have to make a big binder just to keep it all straight then this isn't worth it!
If you're the first person, then welcome and please continue! If you're the second kind, then PLEASE just navigate away and relax. NO ONE has to make up a big binder! This is a great option to give you a way to keep the internet-printed stuff in order so you can easily look up and find the resources you want WITHOUT stressing about it. If this whole process stresses you out, then don't do it!
Supplies
This list of supplies is flexible, and reflects MY personal preferences... that loads of homeschool mamas have found really helpful. I'll give a couple of options to lower the cost if you don't want to spend as much. Remember, I had these supplies laying around from YEARS of homeschooling, so I only needed to buy a couple packs of binder dividers to complete the set. You'll see in pictures that the supplies I have are somewhat worn from being recycled and reused multiple times! The links take you to Amazon with my associate-links where I might get like 5 cents in a year if anyone ever uses them. No cost to you, of course, Amazon just wants your orders!
1.5-2" binder - you'll need that much space to hold all the sections and still have room for papers. I prefer the Avery Heavy Duty One Touch. Remember that mine have been re-used multiple times by school kids! If you get one that doesn't pop open perfectly or the rings don't close, return it - they do get knocked around at Amazon, but this binder is really the best - don't despair if the first one isn't perfect. Or go get it at a local office supply store, but it might cost twice as much.
1 Set of 8 Avery Write-On POCKET dividers - these are really the best. I've used others and they just don't cut it. I consider these 'required', but of course you can use what you may already have at home. They need to have a pocket and be MUCH WIDER than paper, and stick out all the way to the edge of your binder.
You have 2 options for smaller dividers:
3 sets of 8 Avery Write-On Tabs WITHOUT Pockets - these are paper sized, and only the tabs stick out. I split the 3 packs up to give us 6 sets of 4 dividers. You could also mix and match some packs of these with some of the tabs below. You'll see what I mean down below. (at the time of writing, the link above takes you to a 3 pack which is only $10 total! These will be $6-8 each at Office Depot) YOU CAN SKIP THESE ENTIRELY if you only want to use the lower-cost tabs below. It won't make ANY difference to the structure of the binder, I just had these around already, and like them.
Post-It Tabs (not flags). These are Write-On as well and very sturdy, plus restickable multiple times. I've reused them as bookmarks dozens of times. They come in a pack of 88, so 1 set is more than enough to cover your needs here. There are lots of color options on Amazon, just be sure to get the the TABS not the wimpy/papery flags. Get a pack of these even though you may have also purchased the dividers above, you'll need both. You'll also need a TON if you want to tabby your cookbooks... wait, did I say that outloud? I haven't written that post yet... When I do, it will be linked here.
Pencil & Fine Tipped Sharpie - I like using pencil on my big write-on dividers, but sharpie on the little tabs, since there are so many of them and they're cheap enough to throw away if I make a mistake. I always re-use my big dividers, so I write in pencil.
That's it! Let's get to organizing! It's actually super simple, once you have all the supplies. Having the right tool for the job makes ALL the difference!
Set up The Binder

If you have the membership site, go ahead and print the binder set. I also printed the journey pages, food-type cheat sheets, and sweetener conversion chart, and did everything on plain paper instead of cardstock. Since we're using sturdy plastic dividers we don't need the thicker paper for the binder pages.
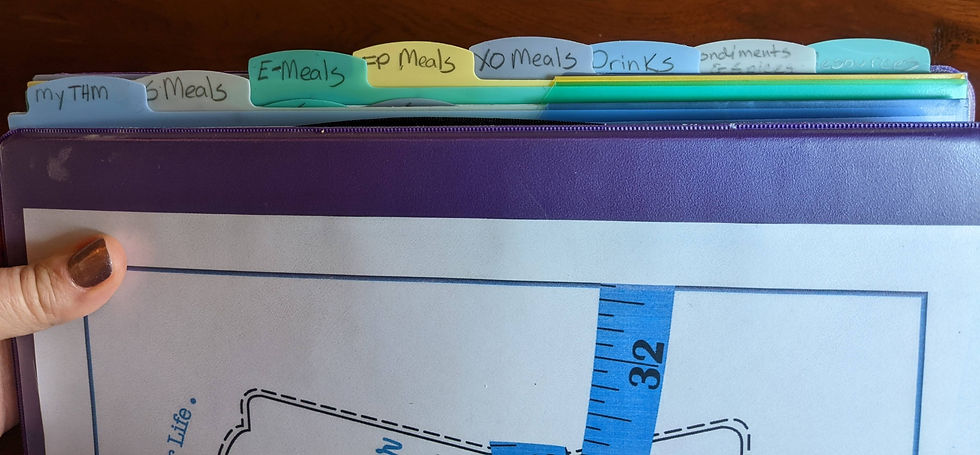
Take out your POCKET dividers, and label them in pencil from top to bottom:
My THM (or My Journey, or whatever you want to call the section with your photos and notes about your journey)
S Meals
E Meals
FP Meals
XO Meals
Drinks (see a green note farther down about another way to organize this section)
Condiments/Spices
Resources
If you have the binder cover sheets, put the right one into each pocket to act as a cover sheet and make you happy when you turn to that section! You'll have a few extras that I didn't use. If you DON'T have the printables, you can leave the dividers as-is, or if you're creative and crafty you can decorate your own either by hand or design something on the computer.
If you have the Personal Journey and notes pages, put them in the "My THM" section. How you divide these is up to you! I used TABS and labeled my first section "Measurements" and then I labeled the next one with the name of a coaching group I'm in, so I can keep notes there. If you don't have a group, you might just label it "Notes". I put all the measurement pages first, and just stuck the tab on the first page. I put my "starting point" page first, then a couple copies of "progress" pages, then the "before and after" page last. You WILL get an 'after' shot if you fully commit and don't give up! I put all my notes pages at the end and stuck my "group" tab on the first page there - you can replace it with your "notes" tab. If you don't have any of those printables, you can just add a small stack of lined paper to record your measurements and notes, or find another set of generic weight and measurement progress pages online.

All the fuel-type sections (S, E, FP, XO) will have the same dividers behind them.
Take out 2 packages of the smaller non-pocket dividers. For both sets, set aside the first 4 dividers with the first 4 tabs. Now you have tabs 5-8, but they're the 'bottom set', which is annoying... Just flip the whole stack over, and voila! 4 sets of 4 tabs and all of them are at the top! If you didn't get the smaller dividers, just skip this part and go to the next step, using TABS instead of dividers for all the labels.

For each section, label the 4 tabs (either the divider tabs or use Post-It Tabs) as follows, using the correct fuel type for the section:
S - Breakfast
S - Lunch/Dinner (if you want to separate these 2 sections go ahead and do that, and put "Sides/Breads" on a Post-It Tab for #5)
S - Dessert
S - Sides/Breads
(you see my extra drinks tabs here, that's addressed in the green sections below - keep reading!)
Place the 4 meal dividers behind the correct pocket dividers.
Repeat labeling for E, FP, and XO types

Your last set of dividers can't be so easily divided. Label the first 3 of them to go behind the drinks section (also, see note farther down):
Sippers
Shakes
Hot Drinks
(if you want more tabs for "other" or anything else, add post-it tabs to a hole-punched sheet of paper)
Under the Condiments & Spices Section, use dividers 4-6:
Dressing
Spice Blends
Sauces
(make an extra tabby) Extras
Behind the Resources Section (flip these over to be at the top again):
Menus
Charts & Reference
For all sections, you can add post-it tabs to make as many sections as you need, but these should be plenty to get you going!
Now all that remains is to place a beautiful cover page on the front of your binder, and a spine label down the side! If you don't have cardstock to print/decorate a spine on, use regular paper, make the labeled part just 1" wide, and fold it like a tri-fold letter to be 3 thicknesses. That will make it stiff enough to slide down without getting stuck. Open your binder all the way flat to make it easy to slide in.
Now when you use your binder, you can easily see the main categories for fuel types, then you open the divider and find sub-categories for each kind of meal. I don't have all of the shakes and hot drinks divided by fuel, but you could easily do so by adding more post-it tabs "S Shakes" "E Hot Drinks" etc. For any sticky Tab, I just place the tab on the first sheet of paper in that section, or a plain blank sheet (if you don't have any recipes there yet). Or for a different approach, you could use tabs to add 'S Shakes' and 'S Hot Drinks' behind the S MEALS tab instead of having all the drinks together in their own section. Think about which way makes most sense to you, and do that. Are you more likely to say, "I'm feeling like a smoothie, let me see what options I have in any fuel" or "I'm feeling like an E meal, let me go look at my Es?" You might also want more kinds of resources in the back. Once you have sticky tabs, you literally have unlimited options!
Another great feature of the wider dividers is the pocket on the front. When you print something out then cook dinner and go to put everything away, you might not immediately have time to go find your hole-punch. Just slip your recipe into the pocket of the right section and you can put it away mostly organized, without losing it until you're ready to punch. I also LOVE having a pocket for the front... It holds a couple of pencils and pens AND has a built-in hole puncher! But I can't fine anything like it on amazon... you might want to settle for one of these.
That's it! I hope that this little tutorial is helpful to you as you organize all the various things that we all print out from the internet!

Comments